Log Executor Expenses
Show Table of ContentsYou can track out-of-pocket executor expenses (i.e., estate-related costs you pay using your own funds, for which you expect eventual reimbursement from the executor) using the Expenses table on the Executor Tab.
Note that expenses paid using estate funds should instead be recorded on the Cashflow Tab.
See below for instructions on accomplishing specific executor expense tasks, and see Financials | Executor Expenses for more background on executor expenses in general.
View Executor Expense Table
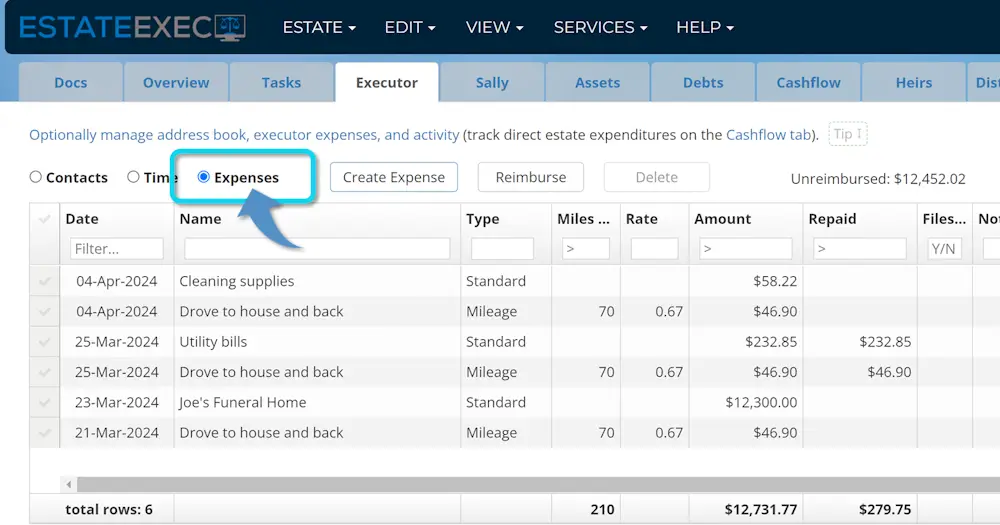
To see the executor expense table:
- Click the Executor Tab.
- Click the Expenses radio button at the top left of the Executor Tab.
Add a Mileage Expense
To claim a mileage expense:
- Click the Create Expense button at the top of the Expense table.
- Select the date of travel (if multiple dates for one expense record, you can explain this in the Notes).
- Enter trip details under Expense Name (e.g., drove to house to sort belongings).
- Click "Mileage" for the Type of Expense.
- Enter the miles driven.
- EstateExec will automatically calculate the amount based on the federally approved mileage reimbursement rate for the applicable year, including a 4 cent increase for NT, NU, and YT. You can override the default reimbursement rate if desired.
Add a Standard Expense
To record a standard expense (such as a bill you paid):
- Click the Create Expense button at the top of the Expense table.
- Select the date of the expense.
- Enter who/what you paid under Expense Name (e.g., PG&E Utility).
- Enter the amount.
Delete an Expense
To delete one or more expenses:
- Select the expenses you want to delete using the checkmark column in the far left of the table.
- Click the Delete button at the top of the table.
Reimburse an Expense
To reimburse one or more expenses:
- Select the expenses you want to reimburse using the checkmark column in the far left of the table.
- Click the Reimburse button at the top of the table.
- Enter any desired information in the Cash Transaction dialog that appears, and click OK.
- Note that this will deduct the amount from the Cashflow tab and enter a corresponding transaction there.
Modify or Undo a Reimbursement
To modify or delete a previously recorded reimbursement, either click the "Paid" cell of one of the expenses involved in the reimbursement, and change the transaction that pops up in the dialog, OR, from the Cashflow tab, click the desired transaction and edit/delete it there.
Include Older Entries
By default, EstateExec will show the most recent entries in the Expenses table. To see more entries, click the "Include Older Entries" button in the bottom right of the table. If that button says "All dates included", it means there are no more entries.
Find an Entry
As with all EstateExec tables, you can search and sort using the column headers. Note that these actions only operate on the entries currently in the local table: if you want to search all entries, be sure to click the "Include Older Entries" button (if present) below the bottom right of the table until all entries have been retrieved.
You can also "tag" entries with whatever terms you like, to sort or filter later – see Using Tables: Tagging for more information.
Remaining Unreimbursed
EstateExec displays the total remaining unreimbursed expenses at the top right of the table, even if all entries are not currently included in the table. In contrast, the summary row at the bottom of the table displays only the sum of the rows currently "visible" in the table. It does not include any older entries if you haven't clicked the "Include Older Entries" button, and it does not include entries you may have temporarily filtered out.
If you don't see the Unreimbursed field at the top right of the table, widen your window so there is room for it to display.
Import from File
If you already have a spreadsheet listing your unreimbursed expenses, you may be able to save time by importing that list into EstateExec (rather than manually retyping everything).
Import Process
To import out-of-pocket executor expenses from a file into the Executor Expenses table:
- Start: On the Executor Tab, select the Expenses Table, and click the Edit | Import Expenses menu
- Select File: Click Select File from the dialog that appears, and the select the file from the Open File dialog that appears
- Assign Column Meanings: A Describe File dialog will appear, containing the contents of your file (similar to that shown at the top of this page). In the first row of the table, select the meaning for each column (e.g., Amount). If your file has a header row, EstateExec will have attempted to make some default selections for you, which you can override as necessary.
- Correct Problems: Once a meaning is defined for a column, cells that appear problematic will be highlighted in pink. For example, if you say that a column contains the expense data, but a cell contains something other than a date, it will be shown in pink. You can click (or double-click) on a cell to edit it so you can correct any problems, or you can ignore it (and EstateExec will do its best, often simply ignoring that value).
- Import the Expenses: When everything is configured the way you want, press the Import button at the bottom of the dialog to add the described executor expenses to the estate (and note that EstateExec will try to intelligently set mileage rates and reimbursement amounts if left blank and mileage is provided).
- Save: If you are happy with the import, press Save All to save the newly imported expenses. Or if you don't like the way it turned out, you can instead press Cancel All and try something different.
Required File Format (CSV)
EstateExec can import from files in CSV (Comma Separated Value) format. A CSV file consists of multiple lines (one per executor expense), with each expense field separated from the next by a comma. Ideally, the file has a header row that helps explain the meaning of the properties. Here's what a sample file might look like:
Date,Name,Type,Kms,Rate,Amount,Notes
26-Apr-2025,Cleaning supplies,Standard,,,$58.22
16-Apr-2025,Utility bills,Standard,,,$232.85
14-Apr-2025,Joe's Funeral Home,Standard,,,"$12,300.00",Oak Casket
12-Apr-2025,Drove to house and back,Mileage,70,0.7,$49.00
Some things to note about the above sample:
- It's helpful to have a header row (see first line), but it's not necessary
- There are no required columns, and EstateExec will do it's best to figure things out
- If you don't have a value for a column's field, just skip it (but remember you still need the comma)
- If you want to include a comma in a field, you can just put quotes around that field
- EstateExec will ignore expense dated prior to the death, unless dealing with a trust
If your file is in a format for a spreadsheet program (e.g., Excel), you can export the contents into a CSV file via the spreadsheet program's Save As function, selecting file type CSV. Note that when you do this, your file must only contain data in the format described above. A header row is helpful, but you must delete any title rows, extraneous notes on the side, extra tabs, and so forth. Your goal is to export a file that contains only a header row (optional), and one row per asset.